Google AdSense is one of the avenues to monetize your blog and to make money online. If you have grown your blog and now getting up to 50% of your traffic from search engines, you can apply for Google AdSense – a Pay per Click ad network program introduced by Google. Once your site is approved, ads will start displaying. Once your site visitors click on the ads, you earn money. Google AdSense is the largest and most popular monetization program for publishers. Unlike other monetization programs, Google AdSense does not strictly base more on number of traffic you get on your blog, rather they base on quality of the traffic sources. You will learn how to apply for Google Adsense for beginners, how to make money from the ad network and how to increase your AdSense earnings. You will also see some recommended alternatives to Google AdSense.

Are you ready to apply for Google AdSense? Make sure your blog meets the basic requirements.
I shared these requirements and how to ensure your blog meets them in this article: How to Optimize your Blog and Videos for Fast Google AdSense Approval.
How to Apply for Google AdSense
1. Login to the Gmail account you wish to use for the AdSense application. Make sure the email account is not associated with any AdSense account.
2. Open a new tab and go to https://www.google.com/adsense. Click on Get Started as shown below.

3. Now follow the screen to screen guide to sign up for Google AdSense. You will be required to enter your domain name, email address. Specify that you wish to be notified on customized help and performance suggestions. Then click on Save and Continue as shown below.

4. Next is to sign into your Google account.
5. Now specify your country or territory. Always select your own country so that you will be able to provide the AdSense account verification requirements.
6. Review and accept the AdSense Terms and Conditions. Next, click on Create account.
7. Congrats! You have successfully created your Google AdSense account. Now follow the guide at https://support.google.com/adsense/answer/7402256 to connect your site and enter your payment details. For some countries, you might be required to verify your phone number.
NOTE: To add AdSense verification code to your site you will need a plugin. Use this plugin – Insert Headers and Footers by WPBeginner. The plugin helps you to insert code or text in the header or footer of your WordPress blog.
Google AdSense Recommended Alternatives
Google AdSense is not the only recommended ad network for monetizing your blog. In fact Google AdSense is not even the highest paying ad network. There are other recommended ad networks for bloggers. But most of them require that your blog to meet a particular range of page view monthly.
Some of these recommended, best, high paying alternatives to Google AdSense include:
- Adsterra
- Media.net
- Adversal
- Taboola Native Advertising
- Infolinks
- Propeller Ads
- Revcontent Native Advertising
- MGID
Feel free to check up these ad networks and their requirements and policies. They are also compatible with Google AdSense. So you can combine one of them with Google AdSense on your blog if you wish. Some ad networks like adsterra approves your application, and also works for low traffic sites.
Now that you have successfully got a Google AdSense, the next challenge might be how to increase your earnings. I shared some secrets and tips below.
Check:
- 25 Best Free Small SEO Tools for Bloggers and How to Use them
- 5 Best Genuine Websites to Work & Make Money Online from Home
12 Simple Ways to Increase your Google AdSense Revenue by 105%
After your site got approved of Google AdSense, the next big question is, How to boost your daily earnings. These days, Google AdSense has tightened their belt and will not tolerate any form of illegal act or shortcut. If you are ready to play by Google AdSense rules and provide quality contents and traffic, they will reward. Not only these, these are few tweaks that can make your daily revenue from AdSense to double up.
Initially I thought that I could make more money by add more ad units to my blog posts. But I got a negative result. I also tried generating traffic through illegal source, my AdSense account was nearly blocked. I faced limited ad serving issue because of it (which was later resolved). That was what made me look for the right way to do things and boost my earnings.
I have ran multiple experiments with Google AdSense ad placement and have discovered few tips that made a difference in terms of revenue. I tried these results on my other sites and they also yielded positive returns. I will reveal these AdSense revenue-boosting tips that will also help you if you implement them.
1. Do Not Violate any Google AdSense Policy
This is the first thing you should bear in mind. Check if your site and its contents are violating any Google AdSense Policy at https://support.google.com/adsense/answer/48182. Make sure you don’t use any illegal means to generate traffic to your blog. Never by any means deceive your readers to click on your ads. Don’t publish any content that promotes immorality like pornography, homosexuality, lesbianism, betting, etc. Don’t add Google ad codes on pages that have little or no value, like your Contact us, About Us, Privacy Policy pages, etc.
Google AdSense will give you the best if you keep to their policies.
2. Write Quality and Search Engine Optimized Blog Articles
Right from the time you were applying for google AdSense, you know strict Google has been when it comes to checking the quality of a blog content. It does not end after Google AdSense application. Don’t relax because you have got a fully approved AdSense account. In fact, this is now the right time to double your effort with regards to writing quality contents.
Quality content does not mean a very lengthy blog post without any value. Always carry out proper keyword research before you start writing. Know what readers are looking for and over deliver with your blog posts. Make your blog posts detailed so that it can engage your readers. The more time a user spends on your blog, the more ads will convert if they eventually click one.
The more value your blog has, the more quality ads Google will channel to your Ad units.
Also note that writing the best article does not guarantee that you will rank number one in the search engine result pages (SERPs). You need to also optimize your blogs for search engines, properly use relevant keywords so that they will properly crawl your blog pages and rank it high.
You can check this article: How to Optimize your Posts to Rank #1 on Search Engines.
3. Get more of your Daily Blog Traffic from Search Engines
Google loves organic traffic from search engines. Quality ads are served to sites that get more of their daily traffic from search engines and a few percentage from other legal sources. Audience directed to your site by search engines spend more time on your blog than those that came from social media. This is because people search for information they need on search engines. So when search engines recommends your site by ranking it top on search results, they will take time to read your blog content to make sure they get all the solutions they have been looking for.
4. Ensure that your Blog Gets Enough Traffic
Even though AdSense does not lay much emphasis on the number of daily blog traffic in their policy, you can earn more by just getting more daily traffic. Always target more than one thousand daily page views if you want earn more from your blog.
Even if you placed only one ad unit and got few clicks, those few clicks will convert more if you have much page views. Once you cross one thousand unique page views and your site has generated more than 1000 impressions that day, you will earn whatever is displayed in your AdSense account’s RPM. This is the revenue per thousand impression.
Google calculates your RPM by dividing your estimated earnings by the number of page views and them multiplying it by 1000.
So let’s assume your current page view at a particular time of a day is 500 and your estimated earning is $10, then your RPM will be:
(10/500)*1000 = $20
NOTE: The more page views you get, the higher the income you are likely to earn, so long as your CPC is high. But note that Google values quality traffic. A blogger whose blog generates 500 quality (organic) daily traffic can earn more than another blogger who uses illegal means to generate 5000 daily traffic.
You can check out this article: 15 Ways to Increase your Blog Traffic and Post Engagement for Free.
5. Target Traffics from US and UK
Traffic from locations like US and UK helps to increase your CPC. So the more traffic you get from these locations, the more clicks users from these locations will give you.
You can boost your traffic from these locations by running targeted paid traffic campaign on Facebook ads or Google ads. But remember to remove all Google AdSense codes from your site until you are through with the paid campaign.
It is against Google AdSense policy to run paid traffic campaign while Google ads are being displayed on your site. They feel that your main intention is to increase the number of clicks and earnings. So, to avoid facing any ban or suspension, remove the code until you are through with the paid traffic campaign.
6. Make Sure your Site Theme is Responsive if you are Using Responsive Ad Units
It is against Google Policy to use a responsive ad unit on a non-responsive site. A responsive site is one that automatically adjusts itself to different view ports; mobile, iPad, PC, etc.
If your site theme is not responsive then use a non-responsive ad unit. But why must you use a non-responsive theme or a theme that is not mobile friendly? It does not have any advantage. Users will not spend more time on any blog that is not responsive.
More than 70% of total internet activities are done with mobile devices. So you need to give these category that gives a higher percentage daily traffic a higher priority.
Download and use mobile-friendly and SEO optimized themes so that web crawlers can crawl and index your site properly.
7. Use Responsive Ad Units throughout
Whether you are creating a link, text or image ad unit, always go with the responsive option. Responsive ad units are more competitive than those that are not responsive. This is because it can display any size of ad, unlike non-responsive ad units where the dimension of the ad has been defined.
8. Add Fewer Ad Units
One mistake most bloggers make is adding many ad units in their blog posts, thinking that it will yield more revenue. No, it does not. Instead, it reduces your potential revenue by giving room for low quality ads to show.
But if you reduce the number of ad units, your ad units become more competitive. This means that ads that have more value will be displayed. The more ad units waste, the more your CPC drops.
I have personally experimented this on my blog. I once added 5 ad units to my blog and took note of the revenue for one week. Then I later reduced the ad units to 3, I noticed that my earnings almost doubled.
9. Place your Ad Units at the Right Locations
The location of your ad units on your blog pages matters a lot. You need to place them right so that they will perform better. Place most of your ad units within your blog post content because this is where your blog audience pay more attentions.
Ads within blog post contents perform better and even attract more clicks than those place beside the header or in the side bar. Place an ad unit after your post’s first paragraph. So that readers will see it immediately after reading the first paragraph.
10. Do Not Add more than One Ad Unit in your Side Bar
Like I said earlier, add few ad units ensures that only quality ads are displayed. It also helps to reduce the redundancy of ads, thus giving ads that have higher CPC to display in your ad units. One of the easiest ways to ensure that ads do not in waste is to add most of your ad units within your blog post content and adding one in the side bar.
Remember that most page views come from mobile device. Also in the mobile view of your blog theme, the side bar appears below the post content. Most users don’t go beyond the blog content. So fewer audience will even see side ads.
11. Use Auto Ads if you have Long Article Contents
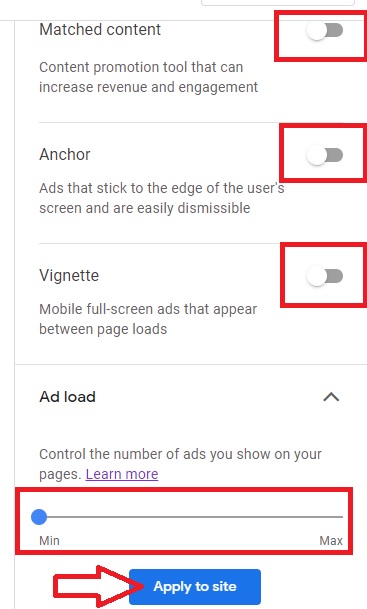
Google introduced auto ads so that they can help you place ads in locations where they will perform best. Auto ads will display different ad formats like:
- In-page Ads: Ads that appear within the main body of content on your pages.
- Matched Content: Content promotion tool that can increase revenue and engagement.
- Anchor Ads: Ads that stick to the edge of the user’s screen and are easily dismissible.
- Vignette Ads: Mobile full-screen ads that appear between page loads.
You only add one code to your site header, then Google takes care of the rest.
The easiest plugin for adding the auto ad code to your site’s header is the Insert Headers and Footers plugin. If you do not want to use auto ads, you can insert ad unit code at any spot in your blog with the Insert Post Ads plugin. Once you turn ON auto ad and add the code to your site, ads will show at relevant locations as determined by Google.
To turn ON auto ads, login to your AdSense account admin dashboard. Navigate to Ads >> Overview. In the By Site tab, scroll down and click on the Edit icon as shown below.

You will be taken to the auto ad Site Settings. Now turn on auto ads by shifting the slider to the right. Also turn on the Optimize your existing ad units button. Save your setting by clicking on Apply to Site.


You will see the estimated number of ads that will appear in your blog pages in the Preview section.
You can also use auto ads together with some custom ad units. In my blog pages, I used a heat map to detect the spot where audience more attention to. It happens to be around the third paragraph. So to make the very best use of this spot, I created a responsive ad unit and inserted it after the third paragraph. You can do the same for your site.
12. Do Not Use Link Ads if you have Huge Daily Traffic
Make out time and check top site who use AdSense. You will notice that they don’t use Link ads. Link ads attract more ad clicks, but reduce your page engagement, especially when placed in the first or second paragraph. And the funny thing about link ads is that they attract more clicks but don’t yield much revenue.
I once carried out an experiment with link ads on my site. When I added it to my site, I got an average of 70 daily ad clicks, but my earning was still poor. So after a week, I removed it and replaced it with a responsive ad unit. The ad clicks reduced, but my earnings doubled up. I also noticed that my CPC also increased.
If you have up to 1000 daily page views on your blog, don’t bother using link ads. Rather use few responsive image/text ads. You will see a very big positive difference in your earnings.
See:
- Blogging vs. Vlogging: What Should You Know and Go for
- 20 Essential Free WordPress Plugins for Top Security and SEO
Conclusion
Increasing your AdSense is gradual process that requires constant experiment. It took me up to 3 months to discover the best settings that yields the best results for my blog. I always experiment any new idea for one week and then take note of the result. After running experiment, I analyze the results and compare it with the result of my previous findings. These are some of the tips that have really helped me boost my AdSense earnings. I tested them in my 2 blogs and the result was very similar.
Feel free to try them on your site. Run experiment with responsive image/text ad units and link ads units and know what best works for you. You may try combining both types, but don’t put link ad units in the first or second paragraphs. They will reduce your site’s reader’s engagement and still yield less revenue. Tell me the combination that works for you.


